Automating OG Image Generation 👀
Table of Contents
Hey everyone! it’s ya boi back at it again with a brand new blog post. I finally got around to writing something after procrastinating for what feels like forever. But hey, better late than never.
So, let’s talk about this super cool code I wrote for this blog. It uses the @vercel/og library to generate images for my blog posts, which is totally awesome if you ask me. Basically, it allows me to customize the image that appears when I share my blog post on social media (Twitter, IMs, etc.) that uses Open Graph protocol. And let’s be real, we all want our blog posts to look as slick as possible on social media, amirite?
import { ImageResponse } from '@vercel/og';
import { NextRequest } from 'next/server';

export const config = {
  runtime: 'edge',
};

const font = fetch(new URL('../../assets/jetbrains-mono-latin-400-normal.ttf', import.meta.url)).then(
  (res) => res.arrayBuffer(),
);

export default async function handler(req: NextRequest) {
  try {
    const { searchParams } = new URL(req.url);
    const fontData = await font;

    const title = searchParams.get('title') || 'Post Title';
    const author = searchParams.get('author') || 'radityaharya';
    const subtext = searchParams.get('subtext') || 'Blog by Raditya Harya';
    const url = searchParams.get('url') || 'https://radityaharya.com';
    const theme = searchParams.get('theme') || 'dark';

    const gradient = theme === 'dark' ? 'linear-gradient(254.59deg, #29323C 0%, #000000 100%)' : 'linear-gradient(74.59deg, #FEA2C3 0%, #8AC4FD 100%)';
    const textColor = theme === 'dark' ? '#fff' : '#000';
    const boxcolortw = theme === 'dark' ? ' w-[327px] h-[20px]  bg-[#fff]' : ' w-[327px] h-[20px]  bg-[#000]';

    return new ImageResponse(
      <div style={{
        height: '100%',
        width: '100%',
        display: 'flex',
        flexDirection: 'column',
        alignItems: 'center',
        justifyContent: 'center',
        background: gradient,
        padding: "40px",
        fontFamily: "JetBrains Mono",
        color: textColor,
      }}>
        <div tw=" flex flex-col justify-between items-start  gap-[124px] w-[100%] h-[100%] box-border">
          <p tw="  border-[#040404ff] text-2xl leading-6 font-mono font-[300]">
            root@local /h/{author}
          </p>
          <div tw=" flex flex-col justify-start items-start  gap-[27px] w-[undefinedundefined] box-border">
            <p tw="  border-[#040404ff] text-8xl  leading-[104%] font-mono font-[700]">
              {title}
            </p>
            <p tw="  border-[#040404ff] text-2xl leading-6 font-mono font-[400]">
              {subtext}
            </p>
          </div>
          <div tw=" flex flex-row justify-between items-center gap-2 w-[100%] box-border">
            <div tw={boxcolortw} />
            <p tw="  border-[#040404ff] text-xl leading-5 font-mono font-[300]">
              {url}
            </p>
          </div>
        </div>
      </div>,
      {
        width: 1200,
        height: 630,
        fonts: [
          {
            data: fontData,
            name: 'JetBrains Mono',
            style: 'normal',
          }
        ],
      },
    );
  } catch (e: any) {
    return new Response(`Failed to generate the image error: ${e.message}`, {
      status: 500,
    });
  }
}
Anyway, let me walk you through the code real quick. So, first off, we’ve got a bunch of imports, including ImageResponse from @vercel/og and NextRequest from next/server. Then we’ve got this config object, which sets the runtime to ‘edge’.
After that, we’ve got this fetch function that grabs a font from the assets folder. Then we’ve got the handler function, which takes in a NextRequest object as a parameter.
Inside the handler function, we’ve got a bunch of variables that are used to customize the image. We’ve got the title, author, subtext, url, and theme. And then we’ve got a bunch of variables that are used to style the image, like gradient, textColor, and boxcolortw. It’s all pretty straightforward stuff.
And finally, we’ve got this big ol’ JSX block that defines the image. It’s got a bunch of div’s and p’s and tw’s (which I assume stand for Tailwind), and it all comes together to create a super slick-looking image that represents my blog post.
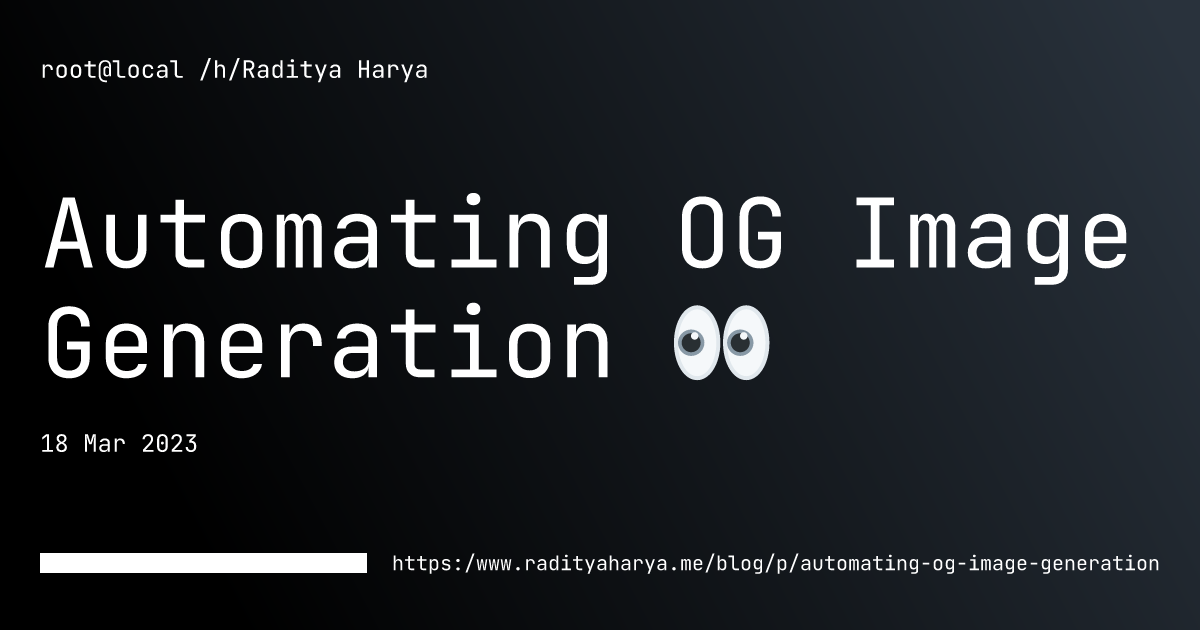
Example of the OG image in Dark Mode
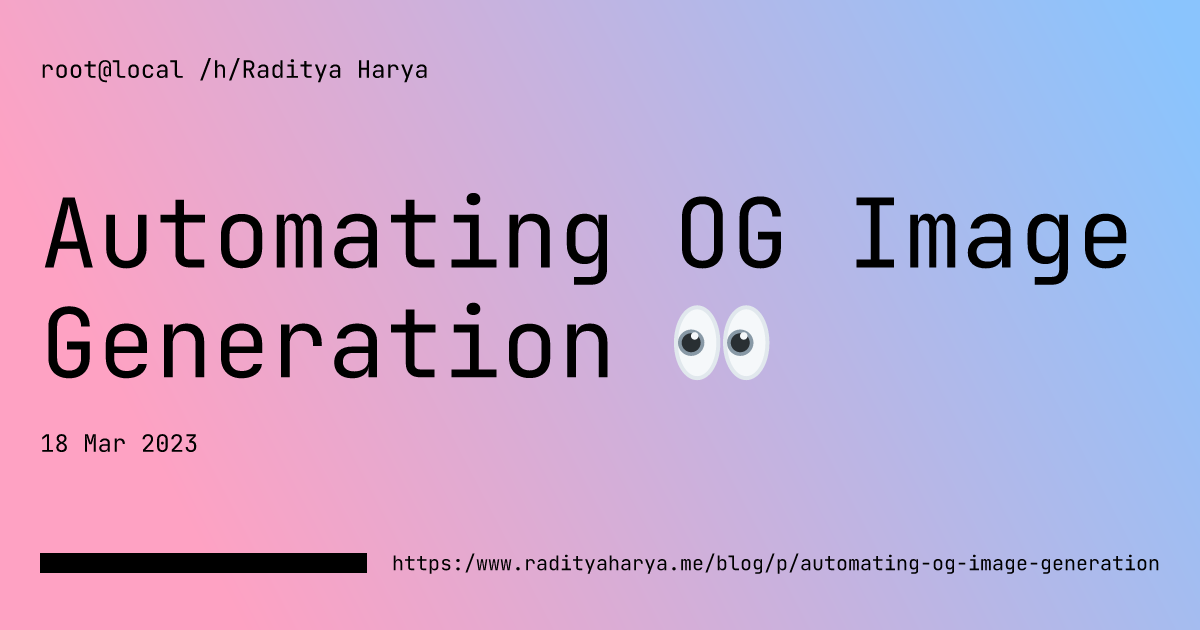
Example of the OG image in Light Mode
All in all, I’m pretty stoked about this code. It’s cool to be able to generate custom images for my blog posts, and the @vercel/og library makes it super easy to do. If you’re starting a blog and want to make it look as slick as possible, I highly recommend giving it a try!